8/29/13

Making Grapevine Wreaths

I have a monster grapevine in my backyard! It's a very old and delicious seedless variety that was planted long before we lived here. It grows like a weed! It's a good idea to prune back some of the runners in the summertime. This helps the vine put more energy into the fruits. It also helps us find the clusters of grapes more easily.

Craft stores regularly sell grapevine wreaths in all sizes; they are great for a multitude of different decorating and crafting purposes. But if you have a grapevine growing in your yard or garden, then there's no need to purchase one. They are easy and fun to make!
The preparation: Prune those extra long, fruitless vines off your plant. From the vines you've pruned off, select the longest ones. You want them to be green and pliable as well. Do this soon after you prune; they start becoming brittle as they dry out. Remove the leaves, but leave the curly tendrils. Once you have a good selection of de-leafed vines, you are ready to begin.

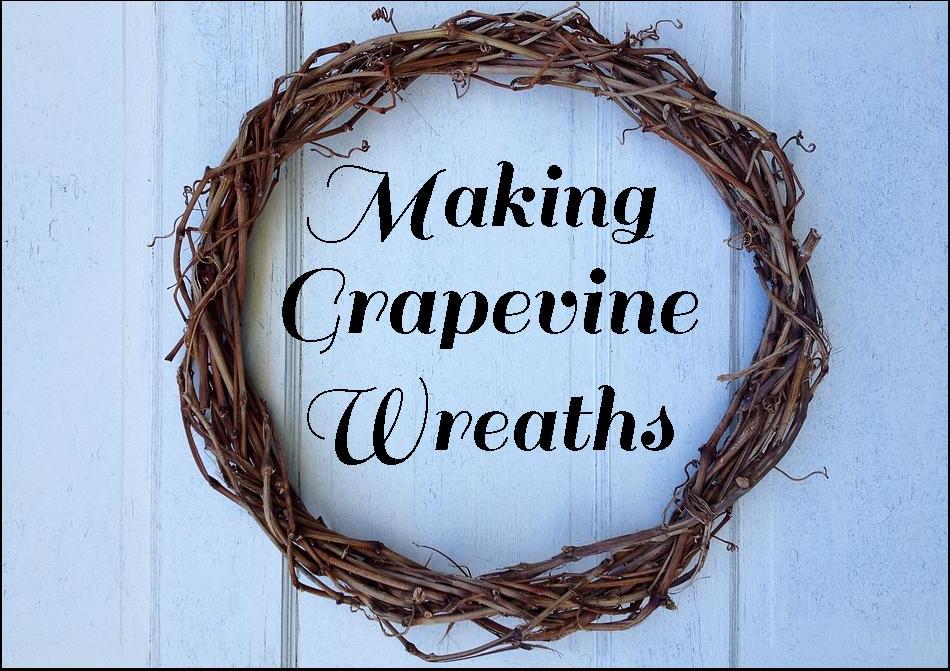
The Project: Start with a nice long vine and curl it into the size of wreath you desire.
Wind it together to create a simple circle and tuck in the loose ends. Don't worry if it's not a perfect circle. You will be able to shape it easier as you add more vines. Tuck the end of another vine into the circle and then wrap it around, tucking in the other end as you finish. Use more vines to wrap around and around. As you go, wrap the vines in different directions and start in different locations. As it becomes thicker and stronger, you can pull it into a nicer circle and it will hold it's shape.  Stop when it is firm enough to hold it's shape and when your desired thickness is achieved. Let them dry on a flat surface until they are brown and thoroughly dried.

This is a great project for a summer or fall evening. My home doesn't have air conditioning of any kind, so we like to sit outside in the summer evening and enjoy the cooler air. Plus, we just love being outside! The other day, we spent an hour or so in our backyard. My husband played his guitar and I made three grape vine wreaths of varying sizes. I love lazy summer evenings like that!

I am already brainstorming on some great ways to use them, so watch for follow up posts...
Check out another great wreath idea using twigs and acorns HERE.
Shared at these great blogs:
The HomeAcre Hop at Black Fox Homestead
Home Sweet Home at The Charm of Home 
From the Farm Blog Hop at Sunny Simple Life 
Clever Chicks Blog Hop at The Chicken Chick
Creative Home & Garden Hop at Little Homestead on the Hill 
Sunday Linky at Suburbs Mama 
Silver Pennies Sunday at Finding Silver Pennies 
Tuesday Garden Party at An Oregon Cottage 
Garden Tuesday at Sidewalk Shoes 
Tuesdays with a Twist at Stone Cottage Adventures 
Rock 'N' Share at The Shady Porch 
The Backyard Farming Connection Hop 
Down Home Blog Hop at Tilly's Nest 
What We Accomplished Wednesday at Green Willow Pond 
 Feature Friday at Blissful and Domestic
Craftastic Party @ Sew Can Do
Monday Funday at Lines Across
Mostly Homemade at Homegrown & Healthy
What'd You Do This Weekend? at The Tumbleweed Contessa
Cottage Style Party at Lavender Garden Cottage

Thank you Silver Pennies!
Thank You Summers Acres!
Thank You 1840 Farm!
The Chicken Chick
Thank You Chicken Chick!

8/23/13

Banana Coconut Macaroons

Recently, I noticed that I had a couple of very ugly brown bananas. Now, for some people that might be a distressing realization, but not for me. An unsightly over-ripe banana is something I find inspiring! It's an excuse to bake something really delicious!

I though about making some banana bread, or some muffins (I'm practically obsessed with muffins!), but I've been thinking about coconut macaroons for a little while now and I was really in the mood for some kind of cookie. Coconuts and bananas are both tropical and delicious, so naturally they should go together!
Banana Coconut Macaroons:
1 medium very ripe banana
1/2 C sugar
1/4 C butter (room temperature)
1/2 tsp vanilla
1/4 tsp salt
3/4 C brown rice flour
3/4 C almond flour
1 C (be generous!) sweetened shredded coconut

Cream together the banana, sugar, butter and vanilla. In a separate container, stir together the flours and salt, then add to the banana mixture. Blend well. Stir in the shredded coconut until well incorporated. Chilling in the fridge for at least a half  hour is very helpful if your dough is too soft. Place spoonfuls of dough onto a greased cookie sheet, or use parchment paper. The cookies will not change shape with baking. Bake at 350 F for 12-15 minutes or until bottoms are well browned, tops are barely browned, but cookies are still soft. Let cool then eat.
I love how these turned out. Crisp at the edges, chewy and soft in the middle. They are very sweet, so if you don't like your cookies very sweet, you might consider using unsweetened coconut instead. I don't eat a lot of sugar, but every once in a while, I want something sweet and these are delicious! We've been practically fighting over them here. No one cares that they are gluten free! That's how good they are!
My brother stopped by the next day, and I pulled out a plate full of these macaroons... He was only here for a few minutes, but by the time he left the plate was empty! Not even a crumb was left! My husband admitted later that he had snitched three of them... My brother ate the rest! I'll take that as a compliment!
 Shared at these great blogs:

8/20/13

Reasons to Love Sunflowers

I love to garden! I love flowers and I love growing my own fruits and vegetables too! One of my favorite garden flowers is the sunflower. Sunflowers are an annual flower that I will always plant in my garden. I love their beautiful flowers, but there are other benefits too, that make them an indispensable part of my garden year after year.

Here are a few great reasons to plant sunflowers in your garden:
1. Easy to Grow
Sunflowers are very easy to grow! Their large seeds are easy to manage, and they sprout quickly. They can be sown directly into your garden and often come up as "volunteers" the following year. I feed wild birds during the winter when the ground is covered in snow and I usually have a few sunflowers sprout up the next spring. They are tough plants and once sprouted and grown, they don't need much extra attention.

2. Screens and Shade
Want to temporarily hide a spot in your yard? Plant a few rows of sunflowers in front of it. Do you want to provide a little shade during the summer? Sunflowers can really come in handy. This year, I planted tall sunflowers along one side of my duck and rabbit run. It not only disguises the boring chain link, but it provides some protection from the sun. As an added benefit, the plants are not harmful to animals who may happen to reach through and nibble the leaves.
3. Birds
Every year, I enjoy watching a variety of wild birds eating from my sunflower plants. They love the seeds! I've also harvested some of the seeds to add to my pet birds' diet.

4. Bugs
Sunflowers are well know for their ability to attract beneficial insects. Some beneficial insects are natural predators to garden pests, others are pollinators. More pollinators in your garden means more fruits and veggies!
5. Food
Those seeds are not just for the birds! Yum! Sunflower seeds are a tasty and nutritious snack! Some varieties of sunflower are grown especially for eating and produce extra large seeds. The whole plant is edible too, but I don't have any experience there. I think I need to do some experimenting...
6. Cut Flowers
Sunflowers make excellent cut flowers to enjoy indoors as well. Be aware that they will spill pollen, but just wipe it away with a damp cloth and don't put them over your nice linens. Do you have a friend who is having a bad day? Bring a sunflower bouquet to cheer them up! Sunflowers have got to be some of the most cheerful flowers out there! It's hard not to smile when you see their sunny blooms.

7. Variety
They come in quite an array of varieties. Some are super tall! Dwarf varieties are much shorter. They come in different colors as well: reds, oranges, yellows... Some have double petaled flowers. There are bushy ones and straight stalk types. With so many options it's not too difficult to find a place for them in your garden.

8/16/13

Blackberry Mango Crisp

In my post about wildberry sauce, I mentioned the blackberries I brought back from my wonderful trip to Oregon. My little brother and sweet husband picked them for me on the last day I spent in Oregon. I was sick in bed with the flu. It was not a fun way to spend the last day of vacation, but I'm really glad it didn't happen at the beginning of my trip! As soon as we got home, my sweet husband washed them up and froze them so they wouldn't go bad. He doesn't like blackberries, so they were safe from snitching until I was over my illness and ready to use them. I have been thinking about those blackberries a lot. I wanted to make something special, but I wasn't sure what.

My inspiration came earlier his week when I came across a fantastic deal on mangoes while grocery shopping. I love mangoes! I love blackberries! It seemed like fate! I came up with this delicious crisp that uses both of these fruits. I hope you enjoy it as much as I did. I have more blackberries left, so I'll be making some other great treats with them in the future.
Fruit Filling:
2 large mangoes pealed and chopped (about 2 C worth)
2 C fresh or frozen blackberries
2 TB lemon juice
1 tsp cinnamon
2 TB brown sugar
3 tsp corn starch

Topping:
1 C oats (certified gluten free if needed)
1/2 C almond flour
1/3 C brown sugar (packed)
2 tsp cinnamon
pinch of salt
1/2 tsp nutmeg
1/2 tsp ground cloves
1/3 C water
1 TB extra virgin olive oil
Extra TB brown sugar

Gently mix together the filling ingredients until the fruit is evenly coated. Spread into the bottom of a 9X9 baking dish (I used two 5x8 dishes) and set aside.
Stir together the oats, almond flour, sugar, spices, and salt until well blended. Add the oil and water and mix until everything is well incorporated. Sprinkle the topping mixture into the baking dish over the top of the fruit. Sprinkle the extra tablespoon of brown sugar evenly over the top.
Bake for 25-35 minutes or until the fruit is bubbling up on the edges and the topping is just slightly browned.
Serve warm or chilled; it's great either way! Ice cream or whipped cream is a nice addition if you'd like, but it really doesn't need anything.
I loved how this turned out! The crisp topping was perfectly sweet with a hint of spicy clove. The mangoes cooked up so smoothly and the two fruits complimented each other well. The color was beautiful too! I love when my food is visually appealing as well as delicious!

Shared at these awesome blogs:

8/12/13

Oregon Coast Wild Berry Sauce

Recently, I spent some time at the Oregon coast. I grew up in Northwestern Oregon and lived very near the coast for several years, so it's nice to go back sometimes. While I was there, I couldn't resist spending some time in the woods picking a variety of edible wild berries. I've really missed the berries since moving away. Most of them were devoured as soon as they were picked, but I kept a few to bring back home with me.
Beautiful red huckleberry bushes loaded with tasty berries!
I brought back some salal berries and two different varieties of huckleberry: Red huckleberries (Vaccinium parvifolium) and Evergreen huckleberries (Vaccinium ovatum). Salal berries (Gaultheria shallon) are native to western North America and plentiful in the coastal forests of Oregon. They are a lesser known, but delicious edible berry. I also brought back some blackberries, but I'll talk about them later... Today I'm sharing what I made with my huckleberries and salal berries.


Oregon Coast Berry Sauce:
1 cup wild berries (I used a mix of salal and huckleberry)
1 1/2 tsp cornstarch
1/2 TB honey
1 tsp water
1/2 tsp lemon juice


In a small sauce pan, add berries, sprinkle with cornstarch and stir until they are evenly coated. drizzle with honey, add water and lemon juice. Stir well. Heat berries over medium heat stirring constantly. Smash some of the berries as they cook. Simmer 2-4 minutes or until sauce begins to thicken and berries are smashed to your desired consistency (you can smash them all, or just a few. It's up to you!). Serve warm or cold on pancakes, ice cream, Greek yogurt etc. Store in the fridge for up to a week or freeze to use later. This is really simple, but really tasty! You can use whatever berries you want, so it's super versatile. I hope you enjoy it!

You guys, the Oregon coast is gorgeous! If you've never spent time there, you should! And if you want suggestions of neat places to explore, I know some; I'm happy to share! I hope everyone is having a fantastic summer!
 Linked up at these great blogs:

8/3/13

Duck Update


Remember the Cayuga ducklings I posted about HERE? I thought I'd give you all a little update on how they are doing.

So far, we are loving these jewel-feathered ducks. And we aren't the only ones! I think I may be the only person alive whose ducks have a social life. In fact their social life might rival mine, but then that's actually not saying much. The neighborhood where I live is full of awesome people. They are regularly wanting to stop by to visit the ducks. I love it! It has given me a chance to get to know my neighbors a little better and it's been a lot of fun.

Cayuga ducks are known for their calm and friendly disposition and we have definitely noticed this to be true. With consistent handling they have become very tame. They don't appreciate being snuggled or anything, but they will come right up and eat out of our hands and are truly excited to see us coming outside with treats. They watch me while I work in the yard and if they see me doing any weeding they start begging for treats. Grasshoppers are one of their favorite treats and they gladly forage for any bugs and grubs they can get at, but they are also fond fruit and veggie scraps and any edible weeds that I pull up from my garden.

One of the reasons we were interested in this breed of duck was because they are generally quieter. The females have the characteristic belly-laugh style quack. Their voices do seem to be slightly quieter in volume than other duck breeds, but not much. Their quietness varies with their personality. We have one girl who is very talkative. Male Cayugas, like other male ducks, have a very quiet voice. When I hear them quack it makes me laugh, sounds like they have laryngitis!

We started with 5 ducklings which ended up being 1 male and 4 females. The male and his favorite girl went to a new home with some magpie ducks (which are pretty cool ducks too!).  So now we have three lovely lady-ducks hanging out at our place.


Blogging tips